Friday, 9 December 2016

Creating the scene - Asteroids Part 3

Animating

After this I added a turbulence to the particles and increased the attenuation so that the asteroids were moving, I also added a vortex field to give more depth to the movement, I turned the attenuation
up on this so it was more of a subtle effect.

I'm not sure if I like how they look however, if I have time at the end I will most likely change them to be more elongated.
(Update: I ended up changing how they look, you can see this in the final animation).

Creating the Shape - Asteroids part 2

Adding more asteroids

After I had my variation of asteroids I needed to make more, to do this I firstly used the nParticle tool to make a box of particles. I then used Instancer to create asteroids at each particle.

This however only created one type of asteroid which is not what I wanted, to fix this i had to write a creation expression. To do this I had to create a custom index in the particle shape and then make a new expression for the index in the Per Particle (Array)


What this expression basically does is it randomises from first object in the list (0) to the last (4) and because 4 is the last on the list, for it to have an equal amount of chance to get chosen by the randomiser I had  to change it to 4.99. I then allowed all data types in the instancer and assigned the custom index to the objects index.

I also did a similar thing for scale except made the random x, y and z between 1 and 4 to give more variation between asteroids. When I did this however I found that some objects were too distorted or elongated, to fix this I added a float for uniform scale and assigned this to the vectors. After this I changed the rotation vectors in the same way.


Creating the scene - Skydome/Asteroids

Skydome

The skydome was pretty straight forward, I used a sphere, inverted the texture mesh and applied a space/stars texture to it. One problem i did have however is that the picture quality was decreased in quality due to the size of the skydome, to fix this i tiled the texture using the hypershade window and this increased the quality without looking like a repeating texture.
(INSERT SCREENSHOT HERE)

Asteroids

Modelling
Firstly to get the shape of the asteroid I created 5 cubes and smoothed them. I then used the Sculp geometry tool to mould the cubes and then smoothed them out again to get some warped spheres. 
After this I assigned a soft body to the spheres so that each vertex is attached to a particle and then I could move the particles and it would move the geometry for me (to get a rocky type texture). 

I then added a turbulence field, played the animation to a point where I liked the deformation and then deleted the particles and turbulence so I had a nicer shape. After this I repeated the step again but set the attenuation to 0 so that each object would recieve an equal amount of deformation in all directions. This gave me a very rocky type look to the object which is what I wanted.


Monday, 28 November 2016

Week 10 - Relationship Constraints

This week we looked at object relationships and how they can be used to link objects together.

Point constraints

These are a good way to keep a certain distance between objects or to get one object to follow another without animating both. If an object is constrained to two different objects it will calculate the difference between them (see image).


Aim Constraints

I think these types of constraints are the ones I will be using most in my animation if I decide to use them. These allow and object to track another objects movement and 'look' at that object. I set up a quick system where one sphere is following a motion path and the cylinder is tracking that sphere.

One way I will most likely use this is for camera tracking on moving objects, a couple of my scenes in my animation require the camera to track a ships movement, this is a perfect way to do just that.

Monday, 21 November 2016

Week 9 - Rigging And Skinning

This week we learnt how to rig models with skeletons and manipulate them using joints.

First step was to make the joints of the skeleton and align them with the hand, this is so they can be manipulated and controlled later


After this I used the interactive bind tool to make sure that no volume was extended more than required.


After this all that needed to be done waws to bind the skeleton to the model and then manipulate the joints. The main problem I faced during this was the model losing shape during joint manipulation, i think this was mainly due to me not editing the bind heat maps very well. I may use this technique in my x-wing model for the animation of the wings but we will see when the time comes.

Tuesday, 15 November 2016

Week 8 - Motion Pathing

Motion pathing is a great way for objects to follow a pr-set path or for use a a make shift camera dolly.

This week we learnt about motion pathing by making our models follow a pre-drawn path. One of the difficulties I found with this tool was that you had to make very smooth lines in order for the movement to look realistic. Also it is hard to change the objects rotation and scale mid way through the path as this stops the animation. I tried adding a keyframe for the U value of the motion path but this didn't seem to change the objects position.

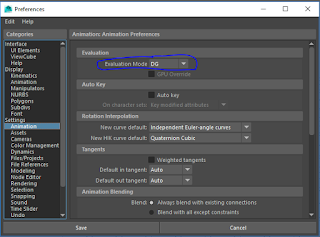
A major problem that I had with motion pathing was that every time I tried to edit the motion path after an object was attacked to it, Maya crashed, it seems like this is a problem with this version of Maya but luckily there was a fix for it by changing the evaluation type to DG from parallel then changing it back when you are done editing the path.

Week 8 - Bouncing ball Animation

This week we learnt about keyframing and animation.

In this practical we were tasked with creating a bouncing ball animation using a schematic as reference. This was easier than I thought it would be and taught me some useful techniques when creating my star wars animation such as key framing and how to use the graph to manipulate certain aspects of the object.

Downfalls/Useful Tools

One of the hard things about this task was keeping the objects shape throughout each frame when I changed the shape in 2 frames after it seemed to change the shape of the first frame too. To fix this I found that the graph editor was very useful, It helps give a smooth animation and helps to visualise what the actual animation is doing.